推荐下载

-
2020-05-12 浏览:740

-
2020-05-06 浏览:521

-
2020-05-08 浏览:510

-
2020-04-04 浏览:504

-
2020-05-12 浏览:502
微信小程序图片上传+服务端接收(PHP)
发布时间:2021-01-09
上次介绍了小程序开发中的微信登录。文章:微信小程序开发(一) 微信登录流程,这次介绍下小程序当中常用的图片上传。前几天做了图片上传功能,被坑了一下。接下来我们来看一下微信的上传a ...
上次介绍了小程序开发中的微信登录。文章:
微信小程序开发(一) 微信登录流程,
这次介绍下小程序当中常用的图片上传。
前几天做了图片上传功能,被坑了一下。接下来我们来看一下微信的上传api。
这里的filePath就是图片的存储路径,类型居然是个String,也就是 只能每次传一张图片,我以前的接口都是接收一个array,我本人又是一个半吊子的PHP,只能自己去改接收图片的接口。
看一下页面效果图
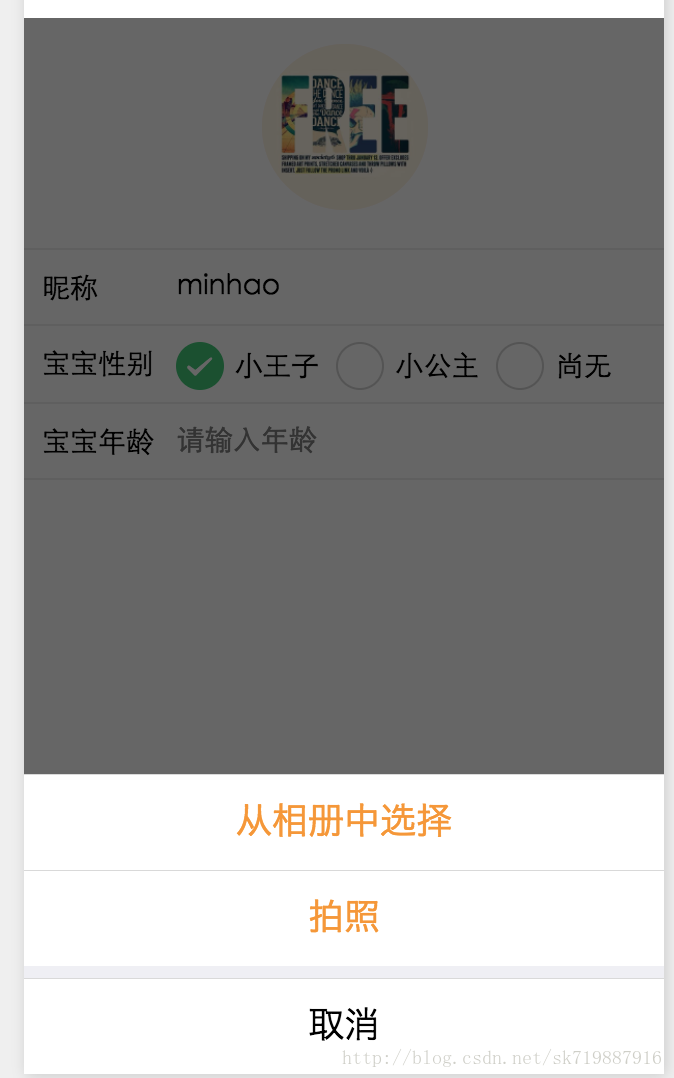
一个很常见的修改头像效果,选择图片(拍照),然后上传。
下面就是贴代码了
首先是小程序的wxml代码
<view class="xd-container"> <form bindsubmit="bindSaveTap"> <image class="xd-img-user1" catchtap="chooseImageTap" src=http://www.yiyongtong.com/archives/"http:/www.wfuyu.com/upload/caiji/20170112/{{logo}}"></image> <view class="xd-view-section"> <text class="xd-abs xd-flex-left xd-text-nick">昵称</text> <input name="nick_name" placeholder="请输入昵称" class="xd-input" value="{{userInfo.user_name}}"/> </view> <view class="xd-view-section1"> <text class="xd-abs xd-flex-left xd-text-nick">宝宝性别</text> <radio-group class="xd-abs xd-radio-group" name="baby_sex"> <label class="xd-label-radio" wx:for="{{sex_items}}" wx:key="item"> <radio color="#3cc975" value="{{item.name}}" wx:if="{{item.name==userInfo.baby_sex}}" checked="true"/> <radio color="#3cc975" value="{{item.name}}" wx:else checked="false"/> <text class="xd-radio-text">{{item.value}}</text> </label> </radio-group> </view> <view class="xd-view-section1"> <text class="xd-abs xd-flex-left xd-text-nick">宝宝年龄</text> <input placeholder="请输入年龄" wx:if="{{userInfo.baby_age != 0}}" value="{{userInfo.baby_age}}" class="xd-input"/> <input name="baby_age" placeholder="请输入年龄" wx:else value="" class="xd-input"/> </view> <button size="default" class="xd-abs xd-subBtn" formType="submit" hover-class="xd-subBtn-hover">保存</button> </form> </view>css代码我就不贴了,1些样式而已。
对应的JS代码 var util = require('../../../utils/util.js') var app = getApp() Page({ data: { sex_items: [ {name:'1', value:'小王子'}, {name:'2', value:'小公主'}, {name:'0', value:'还没有'} ], logo:null, userInfo: {} }, //事件处理函数 bindViewTap: function() { wx.navigateTo({ // url: '../logs/logs' // url: '../load/load' }) }, onLoad: function () { console.log('onLoad') var that = this //调用利用实例的方法获得全局数据 app.getUserInfo(function(userInfo){ //更新数据 console.log(userInfo); that.setData({ userInfo:userInfo, logo:userInfo.logo }) }) }, bindSaveTap: function(e){ console.log(e) var formData = { uid:util.getUserID(), user_name:e.detail.value.nick_name, baby_sex:e.detail.value.baby_sex, baby_age:e.detail.value.baby_age } console.log(formData) app.apiFunc.upload_file(app.apiUrl.modify_user, this.data.logo, 'photos', formData, function(res){ console.log(res); }, function(){ }) }, chooseImageTap: function(){ let _this = this; wx.showActionSheet({ itemList: ['从相册当选择', '拍照'], itemColor: "#f7982a", success: function(res) { if (!res.cancel) { if(res.tapIndex == 0){ _this.chooseWxImage('album') }else if(res.tapIndex == 1){ _this.chooseWxImage('camera') } } } }) }, chooseWxImage:function(type){ let _this = this; wx.chooseImage({ sizeType: ['original', 'compressed'], sourceType: [type], success: function (res) { console.log(res); _this.setData({ logo: res.tempFilePaths[0], }) } }) } })主要讲授1下JS代码
